Quantcast
Channel: YouTube – DIY Musician Blog
Viewing all 87 articles
Browse latest View live

Draw more attention to your YouTube videos with custom thumbnails

$
0
0

Before someone clicks to play your video, they’re probably going to spend a few nanoseconds looking at the thumbnail  for the video that appears on YouTube or embedded on a website. The thumbnail is a quick snapshot preview of the video. In those few nanoseconds, you’ve got to capture a potential viewer’s interest with that single thumbnail image. No pressure.

After you upload a video, YouTube will give you the choice of three thumbnail options pulled automatically from various points in your video. But YouTube also lets you upload your own thumbnail, and I would definitely recommend it, because you can pick the most interesting moment from the video to use as your thumbnail, or even create a whole separate image that isn’t in the video.

According to YouTube:

Your custom thumbnail image should be as large as possible, as the image will also be used as the preview image in the embedded player. We recommend your custom thumbnails:

  • Have a resolution of 1280×720 (with minimum width of 640 pixels).
  • Be uploaded in image formats such as .JPG, .GIF, .BMP, or .PNG.
  • Remain under the 2MB limit.
  • Try to use a 16:9 aspect ratio as it’s the most used in YouTube players and previews.

Once you’ve created a great thumbnail image, check out the video above to see how you can upload it to YouTube along with your video.

Take your YouTube channel to the next level with Illustrated Sound, the YouTube network powered by CD Baby.

Free Updates: 
Get Music Promotion Tips and Exclusive Offers Delivered to Your Inbox

The post Draw more attention to your YouTube videos with custom thumbnails appeared first on DIY Musician Blog.


Manage your YouTube channel while on-the-go

$
0
0

You’re in the passenger seat of your tour van with the stereo cranked, staring out the window and thinking about YouTube tags. Okay, maybe you’re not thinking about tags. But what better time to do some of the management work on your YouTube channel: changing tags, responding to comments, etc? Because the last thing you want to do when you’re off the road is hop online and stare at a screen.

With its Creator Studio app, YouTube gives you a simple way to manage your channel from your mobile device.

Here’s what you can do with the YouTube Creator Studio app

The Analytics Overview tab will display:

* total number of views

* minutes watched

* subscribers

* estimated earning

* percentage of views that come from subscriber

* percentage of likes vs. dislikes on your videos

* a list of your most watched videos from the past 28 days

* real-time view count on your newest 5 videos

The Quarterlab blog has shared some great insights regarding these YouTube analytics:

Knowing how many of your views are coming from subscribers is a great way to see how well you’re doing at convincing viewers to subscribe. It’s important to always give viewers a reason to subscribe to your channel, and if you see that most of your traffic is coming from viewers that have not yet subscribed to your channel then you may want to include more calls-to-action prompting viewers to click the subscribe button. Seeing the ratio of likes and dislikes will help you understand how your audience is reacting to your recent video content, and the realtime view count is the best way to track the performance of videos within the first 24-48 hours of release.

The YouTube Creator Studio app will also display a number of useful information about your advertising revenue, playlists, show you what percentage of your traffic comes from YouTube search results, which 3rd party sites are referring the most traffic, interactivity data for cards and annotations, a breakdown of demographics by age, gender identification, region, and much more.

You can download the Creator Studio app:

For Android from Google Play on devices running Android 4.1 and later.

For iOS from the App Store on iPhones and iPads running iOS 8 and later.


What are the most useful YouTube analytics for you? Do you use the Creator Studio app? Let me know in the comments below.

Take your YouTube channel to the next level with Illustrated Sound, the YouTube network powered by CD Baby.

The post Manage your YouTube channel while on-the-go appeared first on DIY Musician Blog.

How to make an interactive end card

$
0
0

What is an end card?

End cards are a great way to increase your audience engagement, drive more video views, and boost subscribers on YouTube. They’re those short outros that you often see at the end of YouTube videos where the creator can:

  • * ask viewers to subscribe
  • * tease and link to other specific videos or playlists
  • * link to a related behind-the-scenes or making-of video
  • * link to an approved merch store
  • * link to other channels (this is helpful for videos where you’ve collaborated with other artists on YouTube)

Check out the end card at the conclusion of this video I made a while back if you’re curious what they look like, or how they work:

How long should my end card be? What elements should it contain?

End cards should be about 8-12 seconds long to give the viewer enough time to visually process what they’re seeing and what they’re being asked to do. And it’s best not to crowd your end cards with too many options. I always think end cards work best when you limit it to two recommended videos and a subscribe button. If you have an approved merch store, maybe add that one as well.

Creating a YouTube end card

The video tutorial above gives you a good idea of how to create these types of end cards in Premiere Pro, but the process is similar for most editing programs (iMovie, FCPX, etc.)

You have 3 options for creating end cards:

1. create a unique end card for every single video

2. use a template and customize it for each video

3. create one end card that you use on every video

Unlike YouTube intros (which can be added after-the-fact to videos you’ve already uploaded to YouTube), end cards must be part of the video file itself, so you either need to add them during editing or — the more complicated approach — upload a private clip to YouTube that consists of only the end card. Then any time you upload a new video you can use YouTube’s editor to combine your video and your end card into a new video.

Remember to add the annotations!

Once you’ve uploaded your video to YouTube, you need to add the appropriate YouTube annotations to the end card. Otherwise the elements within the end card that look like they should be links will just be confusing parts of a video file to lead no one, aren’t clickable, and frustrate your viewer.

Oh, and don’t forget to export a version of your video WITHOUT the end card

End cards are specific to YouTube since they’re powered by annotations. If you add your end cards within your editing program, be sure to export a version of your video without them for use on Facebook, Amazon, Instagram, etc.


What’s your method for making creative end cards? Let me know in the comments below (and leave a link to your YouTube video).

Free Updates: Become a 
Smarter Musician

The post How to make an interactive end card appeared first on DIY Musician Blog.

Ask your fans (using YouTube poll cards)!

$
0
0

One of YouTube’s newer card options lets you poll your fans

Your video viewers can weigh in:

  • * What song should you cover next?
  • * Which of your studio tracks should you make a video for?
  • * Who was their favorite actor in the video?
  • * Did they prefer the guitar solo or the synth solo?

This feature is perfect for a channel such as Epic Rap Battles of History where the content is, in large part, driven by audience suggestions and engagement. You know their question at the end of every video: “Who won? YOU DECIDE!”

Your usage of poll cards might be more… subtle, but they do give you a great way to ask your fans what’s working best for them.

Adding poll cards is pretty intuitive, but if you need more details, check out this video:


Do you poll your fans? What do you ask them? How does their feedback effect your creative decisions? Let me know in the comments below.

Email Sign Up: Become a Smarter Musician

The post Ask your fans (using YouTube poll cards)! appeared first on DIY Musician Blog.

How to make a DIY music video

$
0
0

This post was originally published on Wistia’s blog.

There are many things you need to make a DIY music video on a budget, besides creative friends with camera gear. Producing your own music video takes creativity, a willingness to get scrappy, and above all else, ideas that are centered around attainable goals.

So, if you’re a musician looking to promote your hot new jam with a music video, or a video producer looking to try your hand at something new, I’d love to share four creative directions I’ve taken with my own music videos. I’ll cover some pros and cons for each type of video, and offer some tips for how to make your next DIY music video TRL quality.

Stripped-down live performance

If you haven’t explored NPR’s Tiny Desk Concert video series, I’d highly recommend checking it out. What I love most about stripped-down live performance videos is that they’re relatively simple to shoot. They require a minimal audio setup, and they leave you with an authentic, intimate version of the song you’re promoting. What’s not to like?

Click HERE to view a live performance video of Dan Mills’ “Best I Could.”

Although we cut to a lot of different camera angles in this video, it was actually shot by one videographer (my wife Sasha) on multiple takes. I knew I wanted this performance to have some B-roll, but I didn’t have access to multiple shooters. With some strategic thinking and some patience, we figured out a plan of action.

To start, my band and I performed the song a few times, while Sasha focused solely on me singing and playing guitar. Lip-synced lead vocals and guitar strumming hardly ever look natural (trust me), so it’s best to use footage from the take of the performance that you end up using for the audio.

Once the band got the performance we liked, we offloaded the audio track from our H4n Handy Recorder and played it loudly through speakers. We then lip-synced and played along a bunch of times, so that Sasha could focus on getting some of the artsier B-roll shots (hands and feet tapping, close-up shots of instruments, and so on). See if you can find the shots that were from the actual performance take we used for the audio, and which ones are sneaky lip-synced fakes.

Not every song will work for this direction, especially if you don’t have a folky band like me, but get creative! People love to hear acoustic versions of their favorite songs.

One-shot video

A lot of people are embracing one-shot music videos, and some of them are absolutely incredible. What I love most about this direction is that the actual video production can be fairly low-key. The music video is nearly finished the second you get a good take of the performance.

One-shot videos almost always rely on capturing some sort of compelling concept. It’s not about the gear you have, it’s about the concept and the performer’s execution of it.

At Wistia, we shoot tons of talking-head videos in front of seamless paper backgrounds. Not only is it a minimal setup, but it was one that I had available to me (pro tip: always find creative ways to use what’s available to you). As I re-watched Woody Allen’s “Annie Hall” one evening for the umteenth time, I had the idea of paying homage to the monologue in the opening scene.

Check out that homage video HERE.

Once we tracked down the costume and Chris Lavigne (Wistia’s video producer and my friend) mimicked the lighting treatment, we were prepared to shoot. The hardest part of pulling off this music video was nailing the performance. In this case, I had to memorize and recite the monologue while slipping in lyrics from my song, in time. Another colleague of ours did a little post-production work to mimic the color treatment, grain, and text… and voila! Video done.

Don’t overlook one-shot videos. They’re a smaller favor to ask of your video-savvy friend. They’re also a wise approach if you or a band mate are going take a stab at filming yourselves.

Storyline video

I came of age in the 90’s. “November Rain,” “Mary Jane’s Last Dance“… yeah, those 90’s. No amount of veteran indie musician status or real-world understanding of the phrase “over budget” will diminish my love for the plot-driven music video. However, when you’re producing your own music video, this direction can be very tricky to pull off.

Click HERE to watch one of our storyline videos (for the song “Young and Free”).

Choosing the “storyline” path often comes with a lot of extra work. Not only will there be ample pre-production involved to solidify your idea, but most storyline videos come with an array of logistical complications. For the two-day shoot we planned for “Young and Free,” we had to lock down multiple locations, try our hand at set design, track down a bunch of board games, cast and schedule actors, worry about directing, continuity, and of course… create and execute on an extremely long and thorough shot list.

The storyline approach was also a much bigger ask for the video producer I was working with (you guessed it—Wistia’s own Chris Lavigne). Chris was down to help make my video happen, but he had to commit to a lot more time for shooting and editing when we chose this route. Do you have someone on board for that? Can you afford to pay someone?

Storyline videos are awesome if you have the idea, the budget, the time, and the pool of talent needed to pull them off. If done right, they can elevate your song and brand to a higher level. That being said, from my experience, a storyline video that misses the mark seems to fail a lot harder than the other approaches I’ve taken.

Lyric videos

The lyric video is a sneaky, low-pressure approach to a music video. Although technically it’s not a music video in the traditional sense, it’s very easy to make and can result in an immersive experience for your audience. This type of video highlights the writing behind your song and can add interesting contextual layers to your lyrics, so take the time to think of unique and meaningful visuals when you’re brainstorming your video. The following are three visual concepts we’ve experimented with:

Network

Let’s call a spade a spade. None of my music videos would have been possible without my network. So my absolute, biggest piece of advice would be to build your network!

Music videos are awesome projects for aspiring film-makers and videographers. Look to nearby universities for starters. Find people that are actually interested in making a music video with you, and be willing to approach this project as a collaboration.

And for all you video folks reading this post—go find yourself a local artist who needs a music video! Head to an open mic or a local acoustic coffee house. Who knows? Maybe the artist will repay you with some background music for some of your upcoming video projects :).

Free Updates: 
Get Music Promotion Tips and Exclusive Offers Delivered to Your Inbox

The post How to make a DIY music video appeared first on DIY Musician Blog.
10 things we learned at VidCon

$
0
0

The present and future of YouTube…

VidCon, the annual conference for lovers of online video, was already a huge deal (last year’s attendance was 16k), but it seems to be growing in size and impact every year. The 2016 VidCon just drew 25k attendees. CD Baby sent three of our team members down to Anaheim for this gathering of video culture and content.

[Take your YouTube channel to the next level with Illustrated Sound, the YouTube network powered by CD Baby!]

Here’s what we learned:

1. YouTube is still on top of the video world

YouTube has now been around for more than a decade. It might seem like old news to some people. It might seem like increased competition in the video space means that YouTube will inevitably lose some influence, but…

2. YouTube is the only platform that provides an immersive experience

Despite the fact that Facebook continues to push itself as a video platform, and other video services like Vine and Instagram have become hugely popular, no other online destination allows you (the creator) to provide a whole experience where viewers can immerse themselves in your content.

3. Successful YouTube creators build out a channel that has specific programming

Part of providing an immersive experience is about using your YouTube channel to pull together an audience around a unique topic (a food network, solo-sailing adventures, impressive long-distance Frisbee feats, etc.). So think about YouTube as a place not just to post occasional videos, but to create your own network of regular programming (music videos, gear reviews, music lessons, live sessions, vlogs, etc.)

4. “Pro” content creators are shifting to YouTube

Even traditional cable networks are investing more and more into creating YouTube content because it’s driving more results.

5. YouTube steps up its education game for creators

YouTube has aggregated the educational content from seven different YouTube sites (including the Creator Academy, Creator Blog, Creator Monthly, YouTube Spaces, Creator Community, Creator Services Directory, and Creator Awards) into one location: https://www.youtube.com/yt/creators, available in 23 different languages.

6. The more subscribers, the more tools you unlock

As part of YouTube’s resource section, you can gain access to more tools and opportunities as your audience grows. For example, when you pass certain subscriber milestones (10k, 100k, 1million, etc.) you receive play button badges. At the 10k mark, you get production access at the YouTube Spaces. And so forth.

7. YouTube makes significant updates to their commenting system

You will now be able to pin comments to the top of your feed, and channel owners can allow preferred subscribers to moderate comments on your channel. This could be huge for creators who don’t have time to moderate and respond to every comment. By entrusting those duties to their community, you can let fans be directly involved with your channel and give them a sense of ownership.

8. YouTube improves their Content ID system

This isn’t a totally new development, but it’s recent enough that YouTube was using VidCon to spread the word: Content ID now allows users to monetize a video while that video is in dispute.

9. Get help as a YouTube creator

YouTube will provide email support to all creators who are monetizing their channel, promising to provide feedback to your emails within one business day.

10. You will be able to stream live to YouTube directly from your phone

YouTube will be building a “Go Live” button into the YouTube app that will let you stream live from your phone, and the video will become immediately available in the YouTube search just seconds after the stream has completed. Right now it’s only available to a limited amount of users, but hopefully it’ll expand soon.


Which of these items means the most to you? Will any of them change the way you’re using YouTube? Were you at VidCon, and if so, what did you learn? Let us know in the comments.

The post 10 things we learned at VidCon appeared first on DIY Musician Blog.

Why you should share YouTube playlist links (and how)

$
0
0

Don’t lose your YouTube viewers to OTHER suggested channels

It’s a good idea to put all your YouTube videos into a playlist of one kind or another. These playlists could be arranged by series, album, or theme (live performances, music videos, rig rundowns, etc.)

Then — if you do what we suggest in the video above — when you share or embed an individual video, your viewers can be guided towards a deeper experience. The next video in the playlist will automatically play at the conclusion of the previous one.

If you only share the standard video link, then YouTube will display a bunch of suggested videos at the end of your own video — and that’s no fun! You don’t want the possibility that YouTube will lead your viewers AWAY from you.

Instead, when you share a video, grab the PLAYLIST link for that video (rather than the standard video link). Here’s how:

  1. Go to one of your playlists on YouTube
  2. Click on the video within that playlist you’d like to share
  3. Click the “Share” or “Embed” button
  4. Make sure the “Share with playlist starting from [current video]” box is checked
  5. Copy the code and share!

Simple enough, right? But musicians often forget to take the extra few seconds to grab the playlist link, and it means they’re losing out on additional views. (I’m guilty too). So let’s remember to remember, okay?

The post Why you should share YouTube playlist links (and how) appeared first on DIY Musician Blog.

Record a cover song video and compete for $1000 in cash prizes

$
0
0

Making cover song videos is one of the best ways to get noticed on YouTube. Plus, when you put your own spin on a familiar song, it can highlight what’s unique about your sound and attract people to your original music.

CD Baby’s Illustrated Sound Network has partnered with WE ARE THE HITS to sponsor a fun cover song video contest where you can get creative, build your audience on YouTube, and have a chance to compete for $1,000 in cash prizes.

Here’s how:

  1. Choose from THIS LIST of pre-licensed popular songs
  2. Record a cover song video of the song (can be in any style, mood, instrumentation, etc.)
  3. Upload it HERE for a chance to win

Videos will be judged on quality of the performance and creativity.

For full contest details, deadlines, and more, click HERE.

Videos are due by 8:59 pm PST / 11:59 pm EST on Wednesday, August 31, 2016, so don’t wait! Winners will be announced the following Wednesday, September 7 HERE, so check back there!

We can’t wait to see your videos! Enter HERE.

The post Record a cover song video and compete for $1000 in cash prizes appeared first on DIY Musician Blog.


“Your music videos should either be 15 seconds or 15 minutes long”

$
0
0

Is this the end of the 4-minute music video?

Mark Mulligan wrote an interesting article on his Music Industry Blog called “Understanding ’15’: How Record Labels and Artists Can Fix Their YouTube Woes.”

In it he argues that musicians should stop focusing exclusively on 4-minute videos (which, due to their length, fall into a “revenue no-man’s land” on YouTube) and start creating music videos that are formatted to capture maximum ad revenue and appeal to the average YouTube viewer based on their usage habits — meaning the videos should be very short (15 seconds) or much longer (15 minutes).

Mark says:

This is where the magic number 15 comes in. Right now music video sits in the same 3-4 minute slot it has done so ever since MTV said it wanted videos that length. Yet video consumption is now polarized between the 15 second clip on lip synch apps likeMusical.ly and Dubsmash and 15 minute YouTuber clips.

Much of Mark’s advice is worth considering, especially for artists who can get creative within that 15-minute format and try some of the video concepts he suggests, including 3-track EP videos, live sessions, mini-documentaries, on-the-road features, and more. Long-format videos like Beyoncé’s Lemonade can be huuuuuge when done well, and Mark also points out that there are some simple ways to make these extended videos without breaking the bank.

But I feel like this argument ignores one crucial thing: music videos are 4 minutes long because songs are 4 minutes long, on average. So it’s not like we got conditioned to create 4-minute music videos because MTV was seeking ad-optimized content (well, actually, that probably was their intent). But the standard music video length just made sense. You make a video that’s as long as your song — with a few notable exceptions (for instance, Mark references “Thriller.”)

What about the SONG?

Most musicians are musicians first and last. Video production can be smart marketing, it can be an inspiring creative exercise, but I think for lots of us it’s icing on the cake, not the cake itself. If you see yourself primarily as a video content creator, absolutely do what makes the most sense for your videos and for the video platform you prefer. But if you’re a musician first, you want everything else to support your vision for how your songs should be presented and experienced, not use the music as stuffing for whatever sized turkey is trending this year.

All that being said, I often love when musicians make extended videos — like Onry Ozzborne’s “duofilm,” which runs exactly 15 minutes. So I think Mark is onto something for sure; I just worry about musicians when this becomes the standard expectation of YouTube audiences, and more generally, when we’re asked to start “optimizing” our art for ever-changing distribution trends that take us further and further away from the heart of what we want to express: songs.

If your average YouTube user want an experience that’s 15 seconds or 15 minutes long, maybe those viewers aren’t really into consuming a song after all, but something else, something new, something that can be equally valid from a creative or entertainment standpoint, but ISN’T a song.

And at that point a musician who primarily just wants to make and perform songs will have to ask themselves if they’re spending time on the right pursuits and platforms.

What do you think?

Am I being naive? Should musicians embrace the changes and tailor their video production and marketing to capture maximum ad revenue and the attention of the average viewer?

Check out Mark’s full article and then let me know what you think in the comments below!

The post “Your music videos should either be 15 seconds or 15 minutes long” appeared first on DIY Musician Blog.

How to get YouTube to promote your videos

$
0
0

This article originally appeared on QuarterLab.


One of the most effective ways to increase your video view count is to have YouTube recommend your videos and promote them on their platform.

There are several places on YouTube where your video can be recommended to people that weren’t looking for it, but how does YouTube choose which videos to promote?

In this blog post we will explore the layout of the YouTube platform and discuss the best strategies for increasing your video’s chances of being featured. We will examine the search results page, watch page, logged-out homepage, and logged-in homepage.

We also show you the specific criteria YouTube uses to rank videos in the Search and Discovery systems, so that you understand exactly how they determine which videos to promote.

Search Results Page

The search results page is the page that displays after you enter a search term in YouTube.

Screen Shot 2016-07-26 at 4.49.27 PM

Videos in the search page are ranked mostly by three important factors: watch time, metadata, and recency.

To increase your video’s chance of appearing on the search page, make sure your content is optimized for all three of those factors.

  • For more on watch time, check out one of our earlier blog posts here.
  • Metadata includes your video’s title, description, and tags, all of which should be aligned and optimized to best describe your content.
  • Recency relates to how new and relevant your content is, related to the search term. Check the table below and focus on the “Primary Optimization Lever” section to help guide your content creation and release strategy.

Screen Shot 2016-07-25 at 11.00.00 AM

Watch Page

The watch page is the page you see while watching a video in YouTube.

Watch Page

There are two sections to the right of the main video on the watch page: the “up next” section in the top right (displays one video) and a list of recommended videos below.

The “up next” section displays more videos from the partner channel. It’s smart to set up series playlists so that videos in the playlist get automatically initiated after the current video ends.

Below the “up next” section, YouTube lists several recommended videos. The recommended video section on the watch page is mostly generated by videos with a related topic (i.e. people who viewed this video, also viewed this next video), videos that are sequentially watched, and videos based on the viewer’s interests and past viewing history.

Check the table below and focus on the “Primary Optimization Lever” column to see the factors that determine which videos YouTube promotes on the watch page.

Screen Shot 2016-07-25 at 10.57.31 AM

Logged-Out Homepage

The logged-out homepage is the first page you see when you go to YouTube.com and aren’t logged into an account.

Logged-out

It’s important to note that the logged-out homepage should not be included in your programming strategy, since there is very little you can do as a channel to influence the content featured here.

The most prominent thumbnails you see on the homepage, when logged-out, are the most popular videos in your country. YouTube features videos that are popular and broadly appealing in this section.

The logged-out homepage also features popular videos from other various genres as well as currently trending topics. Personalized recommendations are also sometimes made based on your viewing history (even when logged-out).

See below for a table from YouTube that shows which levers help determine the content that’s displayed on the homepage.

Screen Shot 2016-07-25 at 10.53.04 AM

Logged-In Homepage

The logged-in homepage is the first page you see when you go to YouTube.com and are signed in with a YouTube account.

Logged-In

The top two factors that are used to rank videos in the logged-in homepage are watch time and channel engagement. Those should be the two things you try to improve most on your channel to get your content featured on the homepage of a logged-in account.

Content on the logged-in homepage will be relevant to the viewer based on their subscriptions, similar interests, and frequent engagement with specific channels. The logged-in homepage features a “guide” on the left hand side of the page that displays all the updates made to the channels the viewer subscribes to.

See below for a table that explains the factors YouTube uses to display videos on the logged-in homepage. As always, pay close attention to the “Primary Optimization Lever” for tips on how to improve your channel engagement and watch time.

YouTube Platform Study Guide (dragged)

Understanding these features are key to growing your channel’s engagement and overall success. It’s important to keep all of these factors in mind when uploading content and developing a strategy for your video releases. Feel free to reach out to us for any clarification or further explanation on any of these topics.

Take your YouTube channel to the next level with Illustrated Sound, the YouTube network powered by CD Baby!

The post How to get YouTube to promote your videos appeared first on DIY Musician Blog.

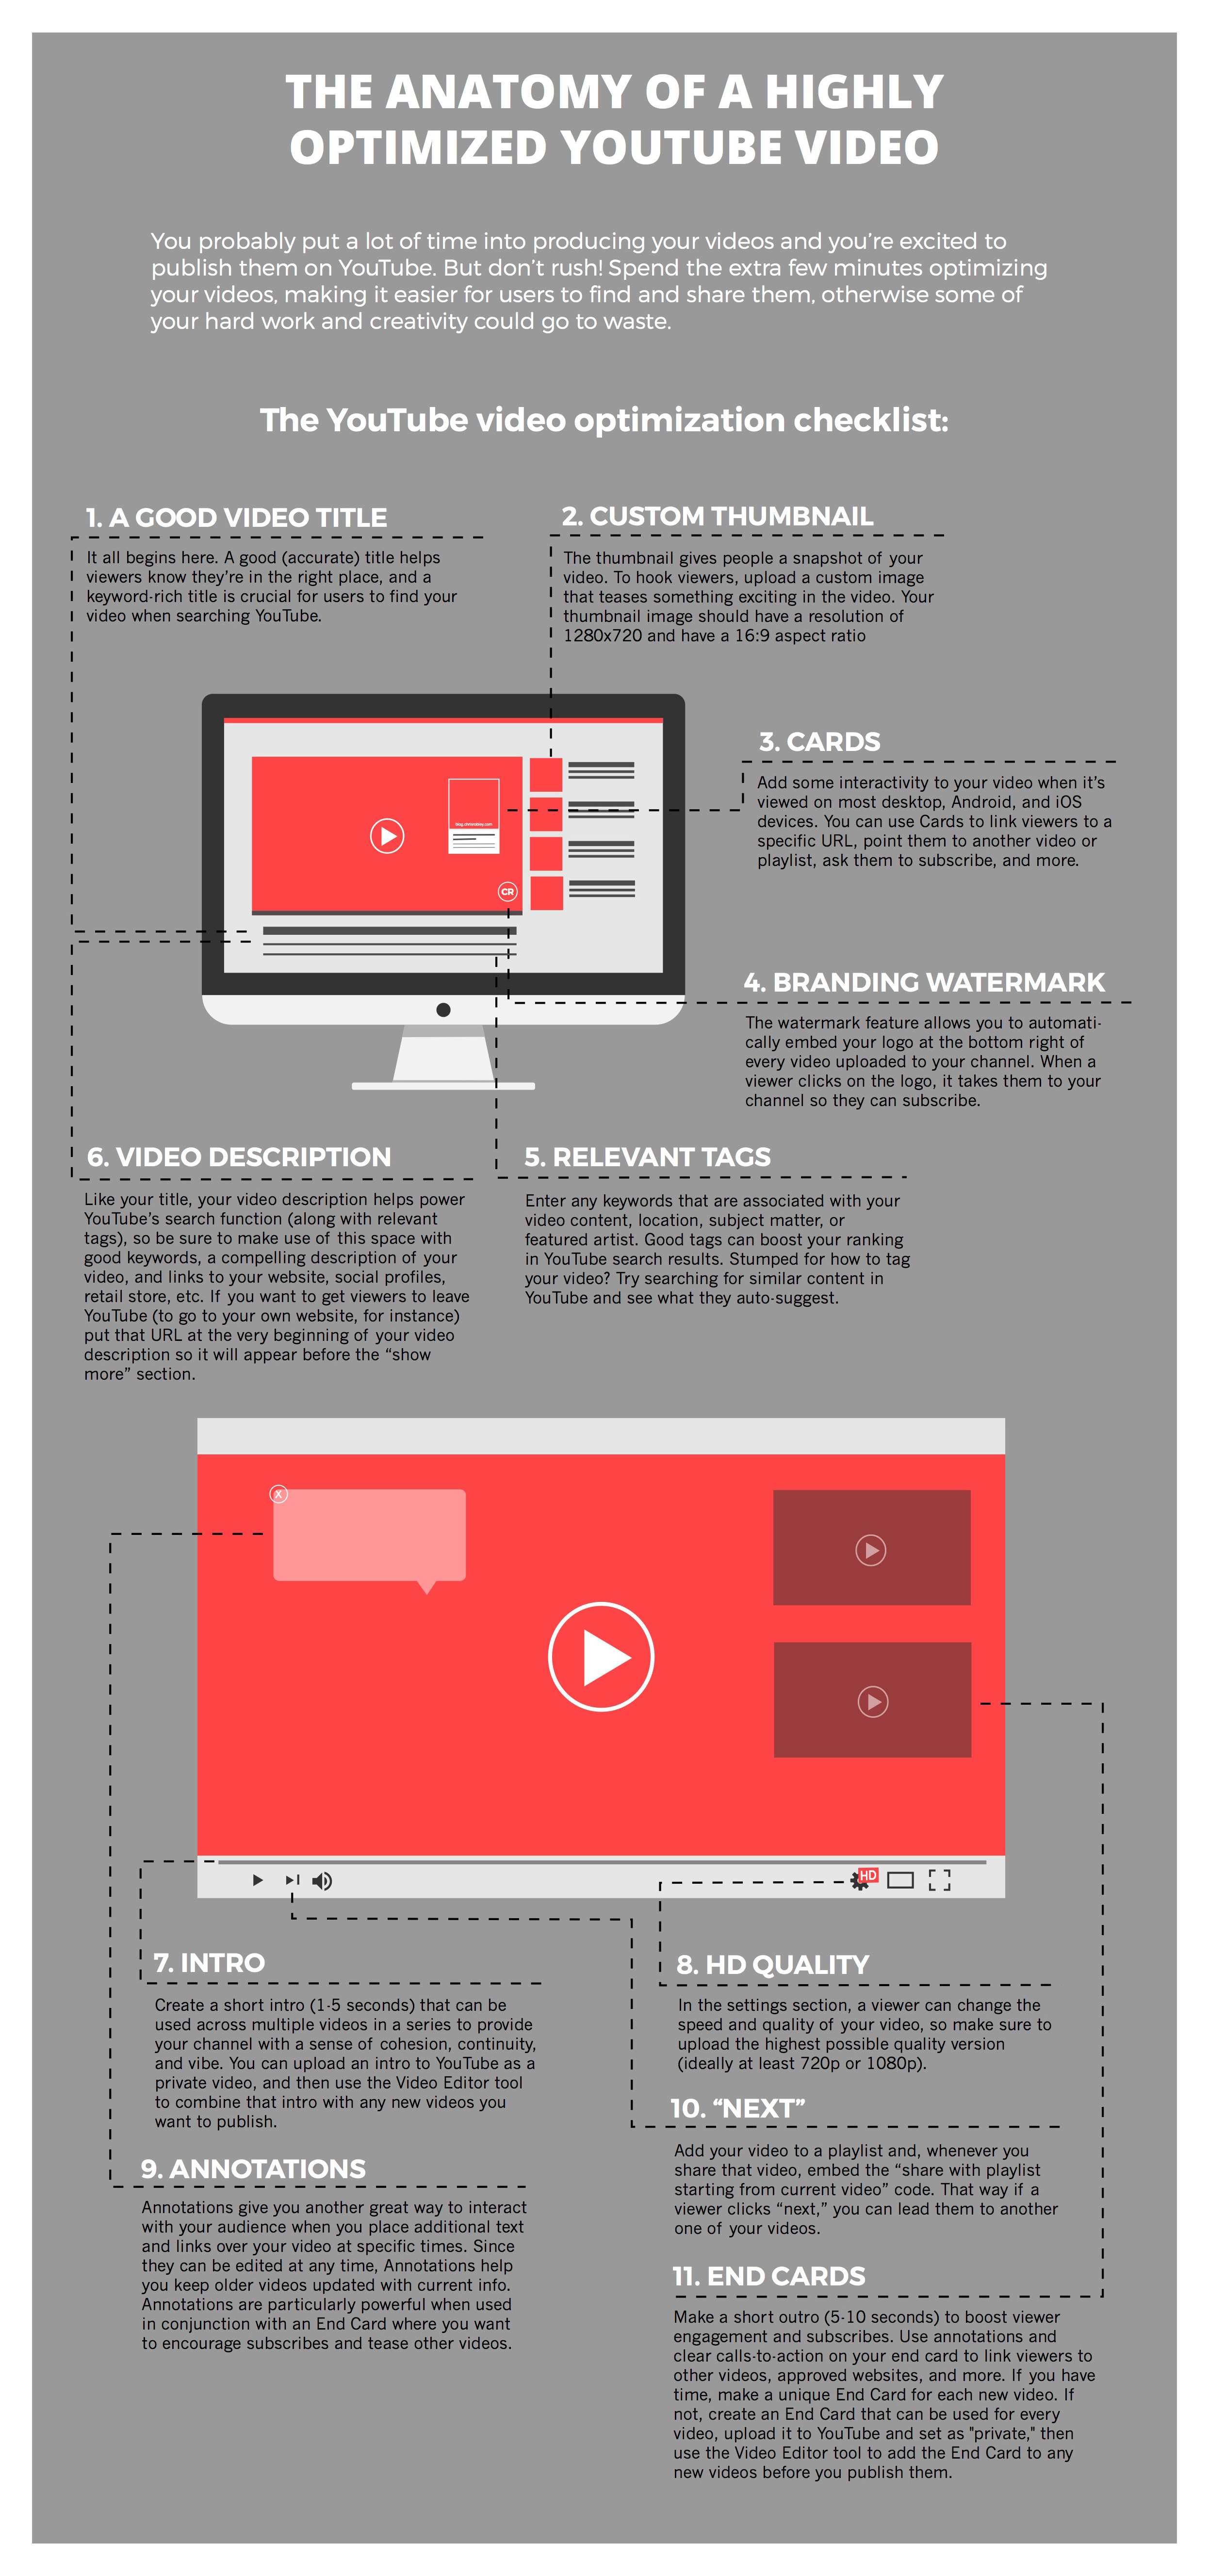
The anatomy of a highly optimized YouTube video (INFOGRAPHIC)

Announcing the winners of our Summertime Hits cover song video contest!

$
0
0

There were quite a few really high-quality and creative entries to The Summertime Hits Cover Song Video Contest (hosted by CD Baby, Illustrated Sound, and We Are the Hits), but after much consideration, our judges have announced our three winners. Here they are…

First Place: IndianRaga (Raga Labs) – “Cheap Thrills” by Sia

Second Place: Henri Bardot – “Cruel Summer” by Bananarama

Third Place: Jourdan Hines – “Can’t Stop the Feeling” by Justin Timberlake

Congrats to the winners, and thanks to everyone who participated!

Watch all of the contest entries on our YouTube channel.

Take your YouTube channel to the next level with Illustrated Sound.

The post Announcing the winners of our Summertime Hits cover song video contest! appeared first on DIY Musician Blog.

YouTube improves its de-monitization process for videos deemed non advertiser-friendly

$
0
0

There’s been a lot of talk lately about changes to how YouTube de-monetizes non ad-friendly content, meaning if your content isn’t “ad-friendly,” YouTube will prevent ads from appearing on those videos.

But here’s the thing: nothing has really changed except for the fact that now you can actually see when your video has been demonetized.

Prior to this change you’d have no indication within your YouTube account that a video had been deemed ineligible for monetization. Now, not only is this news clearly communicated to the content owner, but YouTube has also implemented a review process if you think your video has been demonetized in error.

What kind of YouTube content is NOT ad-friendly?

Videos containing the following elements have a high probability of being demonetized:

  • Sexually suggestive content, including partial nudity and sexual humor
  • Violence, including display of serious injury and events related to violent extremism
  • Inappropriate language, including harassment, profanity and vulgar language
  • Promotion of drugs and regulated substances, including selling, use and abuse of such items
  • Controversial or sensitive subjects and events, including subjects related to war, political conflicts, natural disasters and tragedies, even if graphic imagery is not shown

Here’s what YouTube says about the changes

Here are the changes related to videos that are demonetized due to advertiser-friendly content concerns:

1. We’ll change the $ icon in Video Manager to yellow with the hover message “Not advertiser-friendly. Request manual review” to make it more clear when a video is demonetized.

2. We’ll send you an email notifying you if a video is demonetized due to advertiser-friendly content concerns. Note that demonetization decisions may not happen immediately, so a video may be monetized for a period of time after it is uploaded and then become demonetized.

3. You can click on the yellow $ icon next to any video that is demonetized due to advertiser-friendly content concerns in Video Manager to request an appeal by human reviewers. You will be notified once a decision is made on the appeal, and if it is successful, your video will immediately be monetized again and have a green $ icon in Video Manager.


Questions about YouTube’s ad-friendly guidelines? Check out more info HERE.

Take your YouTube channel to the next level with Illustrated Sound.

The post YouTube improves its de-monitization process for videos deemed non advertiser-friendly appeared first on DIY Musician Blog.

YouTube makes it easier to be upfront (literally) with your fans about paid promotions

$
0
0

YouTube’s new paid promotion disclosures

Transparency is cool, right? Your fans deserve to know when you’re getting cash for a product placement, don’t they? YouTube thinks so, which is why they’re making it easier for you to disclose right at the beginning of your videos whenever they contain paid promotions.

Why is this important?

Well, YouTube is now one of the most powerful media sources, and brands are finding interesting ways to partner with “creators” (man, I hate that term) to get their message to new audiences in ways that hopefully seem authentic and entertaining. But viewers aren’t stupid, and you definitely don’t want YOUR fans feeling like you’re trying to manipulate them. So, be upfront and honest about your promotion partnerships.

If you’ve partnered with a brand to feature their product or service in a video (in exchange for $$), you need to notify YouTube by checking the “this video includes paid promotion” box in your Video Manager’s Advanced settings tab. That helps YouTube limit the advertisements served on the video to ads that won’t compete with your partner.

But in addition, you can now also place a short text disclosure at the beginning of any of your videos to tell viewers about a paid promotion.

Here’s how: https://youtube-creators.googleblog.com/2016/10/a-new-optional-feature-for-paid.html.

The post YouTube makes it easier to be upfront (literally) with your fans about paid promotions appeared first on DIY Musician Blog.

Creating a good lyric video for less than $10

$
0
0

How to make a lyric video for your song (without using Motion or After Effects)

Lyric video: a video that shows your song lyrics while the music plays. [Pretty self-explanatory.]

Not only are lyric videos a great and manageable way to keep your video content coming in between bigger projects that involve more complicated production, but I’ve found they can actually be a lot of fun to make.

Below I’m going to talk about how I created four different lyric videos along with info on some of the FREE tools I used.

A few things to keep in mind:

  • I’m not a video guy. Every time I make one of my own lyric videos it’s a process of trial and error. A pro could probably create something twice as good in half the time, but I enjoy playing around to find solutions on my own. Plus, video budget? (Pshaw).
  • You can make really cool lyric videos with programs like Motion and After Effects. I didn’t. For one, those programs cost money (see pshaw above). But diving into one of those programs would mean I have yet another learning curve to climb. I’m interested in exploring Motion at some point, but in between family, work, and everything else, I’d rather use what time is leftover to make music and bang out some videos, not hunker down in the lab for days on end. Maybe those programs are easier to use than I’m imagining, and I’m missing out (let me know in the comments), but for the sake of this article, let’s just refer back to the zero-budget appeal of making lyric videos WITHOUT Motion or After Effects.
  • That leaves you with free video editing software like iMovie or Windows Movie Maker. Pros might scoff at these intro-level video production tools, but when you combine them with a few other tricks, plus some creativity, I think you can create compelling lyric videos with little more than what comes loaded on most desktops, tablets, or smartphones. [Full disclosure: I used Final Cut Pro X on three out of the four videos below, but I’d worked in iMovie for long enough before that to know most of the things I’m doing in FCPX can be done in iMovie.]

Beginner tips for making lyric videos

  1. Open your movie-making software and set your new project’s aspect ratio to 16:9.
  2. Import your song and any other media (like video clips, still images, logos, etc.) that you plan to use.
  3. Move your first clip or background image to the project pane. If you plan to use one static background image the whole time, you can click and drag to adjust the duration that it appears so it’s long enough to display during your whole song.
  4. Place your song into the project pane. If you want it to start playing right away, drag it all the way to the left. If you have a title page or some other introductory elements, you can leave a little room before the song starts.
  5. Use “titles” to place the lyrics on the video at the appropriate time during the song, matching with the vocals.
  6. Use a font size and style that’s readable (or that looks cool at the very least).
  7. Position your titles on the video (again, by dragging) so they appear in a place that’s legible. For instance, if you’re using a still image of a sandy beach below a light gray sky, you don’t want white font to appear over that sky. Better to drag it down so it appears with starker contrast over the dark sand.
  8. Make adjustments to the length of the titles (you can do this by clicking and dragging) to smooth out the transition from line to line.
  9. Watch your whole video a few times through and make any needed fixes.
  10. Export your video file and upload it to YouTube, Facebook, Vimeo, etc.

Some tricks to spice up your lyric videos

Above is the lyric video for my song “Silently.” To create it I followed all the basic steps mentioned above, but here are a few of the bonus elements I added for (hopefully) extra impact:

  • Hyperlapse sunset — One afternoon when I was visiting Oregon, I ran up to the top of Mt. Tabor (an extinct volcano in the heart of Southeast Portland) and found a good spot to film the changing sky as dusk fell. I made sure to be out of the way of anyone who might walk in front of the camera and ruin the looooooong time-lapse shot. Hyperlapse is a free app from Instagram, and it makes it easy to shoot long videos and then speed them up at various rates. I think my 4-minute music video required about 45 minutes of footage.
  • Intro titles from Word Swag — If you read this blog frequently, you probably know I love Word Swag, a free app that lets you add cool fonts to images. I used Word Swag to create both the circle logo at the beginning with my name in it, and also the “Silently” title. You could use this app to create text for every single lyric, but that’d get time consuming so I just ended up using it for those two elements at the beginning. For this purpose, within Word Swag you’ll usually want to lay the font over a transparent background so you can fly it into whatever video you’re creating without disrupting the moving footage. [Note: I used Word Swag to create the intro text for all the lyric videos below.]
  • Sketch effect — I then added some built-in effects, including a color saturation effect and two doses of a sketch illustration effect, to make the video look grainy and lo-fi. Like I said above, this wasn’t premeditated. Just playing around with effects to see what looked promising. On that note…
  • Earthquake wobble effect — I used the earthquake effect because I thought it kind of made the text look like it was on a transparent slide overlay that was out of focus for a second.
  • Alternating pacing of lyric appearances — Sometimes the lyrics appear and disappear with the vocal. Sometimes certain lines linger. I just went by feel, and payed more attention to how the titles looked laid out across the screen than anything particularly musical.
  • Alternating the color of the text — This is another obvious way to add some variation if you feel like your lyric video is too much of the same thing: change the colors of the lyrics!

Here’s a video I just posted today for a song called “Morning Edition.” The recording is actually just a Garageband demo, but I figured with only two weeks until election day, if I’m going to make some kind of statement, there’s no time to wait to get my band into a proper studio. So, a few notes about this lyric video:

  • A lyric video can still have live action — I’ve never really liked the distinction between “music video” and “lyric video,” as if one is more legit and exciting than the other. As someone who listens to lyrics just as much as the music, I love good lyric videos, and I think there can be an interesting hybrid between these two approaches. For “Morning Edition” I lip-synced to my song, 10 seconds at a time, while using the Face-Swap tool in Snapchat to graft a certain someone’s mug onto mine. Then I edited all those takes together and applied a sharp contrast filter to blend the background of the Snapchat clips with the large black borders on both sides of the clips.
  • Did I say the lyrics have to be legible? — Well sure, it’s good to have legible lyrics, but I don’t think they need to be HUGE if that means you’re ruining the aesthetic of the video. For this one I figured I’d keep the text in a thin minimalist font at the top of the screen, out of the way of my face, and anyone who really wanted to read along could watch the video in full-screen mode.

Here’s the lyric video for my song “Veterans Day.” By complete accident — again, lots of playing around with built-in options — it ended up with a kind of Zen art aesthetic. Here’s how:

  • Stock video — I looked through tons of stock video sites to find an affordable, hi-res clip that could be used as the background for the whole video. I ended up buying (for less than $10) a short video of milk being poured into a clear glass of water with a black background. But 6 seconds of video wasn’t going to cut it for a 5 minute song, so I…
  • Slowed the clip WAY down — I stretched the clip as long as it could go and still only had about 2.5 minutes’ worth. So then I…
  • Reversed the clip — By duplicating the clip I had 2.5 minutes of forward motion, and 2.5 minutes of backwards motion. So the result is like a palindrome, or like that famous bass solo on “Call Me Al.” Halfway through, the whole thing turns around and the milk goes back into the bottle by the end. Another accident that I ended up enjoying.
  • Color inversion — I used the built-in tools to invert the colors so the white milk became like black ink, and the black background turned to a light gray.
  • B&W — I then took that video and turned it to black and white, which ended up darkening the whole thing in a nice way.
  • Scrolling text — One of the built-in title options on many video software programs allows you to scroll text vertically, like the end credits of a film. I used this effect separately for each verse and chorus of the song. Then I did another layer of scrolling text with just a bunch of randomly spaced letters and symbols, with a high transparency on the font so it appears as a graphic element, and I think it gives the whole video a kind a translucent papery feel.

Here’s a few things you might be able to learn from the lyric video to my song “Premiere:”

  • Still photos are your friend — Check out royalty-free photo sites such as Unsplash. I made the entire video for “Premiere” using photos I found on that site. The one risk you run is that other artists use the same photos in their work, but you can always tweak the images so they’re barely recognizable as I did with the milk video in “Veterans Day.”
  • Don’t be afraid of Ken Burns — He has a built-in video effect named after him for a reason; that technique of zooming in and out on still photos can be really effective for creating mood. Dynamics! Don’t go crazy or anything with the motion, but a little Ken Burns here and there can make flat photos come to life.
  • Mix and match fonts — I used a bunch of different kinds of fonts on “Premiere,” giving each section of the song its own feel.
  • Apply effects and transitions to the titles (text) too — Don’t forget that many of the same effects you can use on pictures and video will work to give your lyrics an interesting look as well.
  • Don’t publish your video until you’ve proofread it a dozen times! — If you watched my lyric video for “Premiere” you might’ve found a typo. Whoops. I didn’t catch it until it’d been posted for over a week, and by then… oh well. Staring at text while you’re editing gets tiring. Your brain tricks you. While you’re in the process of creating, you might not catch something that seems glaringly incorrect later on. So get some bandmates and friends to watch the video a few times to make sure you don’t have any spelling or grammar issues on your lyrics (I mean, besides the usual grammar or syntactical issues that ALL lyrics have). Another way to limit errors is to…
  • Write your lyrics out in Word and then paste them into your titles — When you type your lyrics in Word first, you get the benefit of the program’s spellcheck system. Some of the popular video editing software doesn’t have spellcheck, so paste those lyrics in after you’ve vetted them in the external doc.

Okay, those are some of the tricks I’ve used to make my lyric videos more interesting than just white font on a black background, all without paying for extra software or expensive stock footage and images. Hopefully they’re helpful as you create your next video.

Do you have any advice to add? I’d love to hear it. Holler in the comments below and be sure to post a link to your best lyric videos on YouTube!

The post Creating a good lyric video for less than $10 appeared first on DIY Musician Blog.


How to add end screens to your YouTube videos

$
0
0

Introducing a mobile-friendly tool to drive more engagement at the end of your YouTube videos.

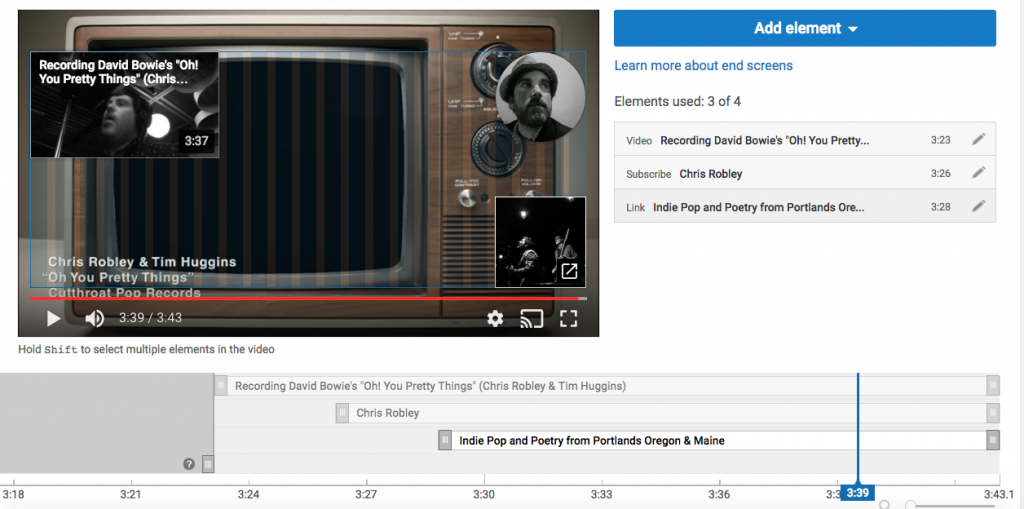
It’d been in beta for a while, but YouTube has finally rolled out end screens for everybody. End screens are visual overlay elements that show up on the last 15-20 seconds of your video. They’re like a mobile-ready version of annotations, but they look WAY less clunky.

End screens can help you build your viewership because they appear on both mobile and desktop devices (iOS and Android), and can be used to:

  • Get your viewers to check out other videos, playlists, or channels
  • Ask your viewers to subscribe to your channel
  • Send traffic to an approved website
  • Offer merch
  • Get fans involved in a crowdfunding campaign

You can add up to four end screens during the last 20 seconds of your video, and each element can expand to show more info when you hover over (on desktop) or tap (on phones and tablets).

In the image I posted above you can see three different end screens appear at once. I took that screenshot just to show a few options, but I wouldn’t recommend displaying more than one at a time because they’ll compete with one another for your viewer’s attention.

You can see end screens in action during the last 20 seconds of my video here:

Any viewer who has disabled annotations will still see the end screens on your videos, BUT you won’t be able to put end screens on a video that already has annotations — so, time to choose! If you decide to add end screens you’ll be promoted to “unpublish” the annotations first (they can be republished later if you change your mind).

Here are YouTube’s instructions on how to add end screens to your videos:

  1. Sign in to the your YouTube account.
  2. In the top right, click your account icon > Creator Studio.
  3. In the left menu, select Video Manager > Videos.
  4. For the video you want to add the end screen to, click Edit.
  5. In the top tab bar, click End screen.
  6. If the selected video contains annotations, follow the instructions to unpublish them. You can re-publish them at any time.
  7. You’ll see your video with the predefined grid and a timeline below that indicates the available part for the end screen. Click Add element. You can add up to four elements, and one of them must be a video or playlist.
  8. Choose how to build your end screen:
    • Add element: You can add up to four elements to a video. At least one element must be a video or playlist. Select each element and fill in the required information, then click Create element.
    • Copy from video: You can copy an end screen from another one of your videos and edit the elements.
    • YouTube template: You can choose from predefined formats that show combinations of elements. You’ll need to define the content for the elements in the end screen, such as add the channel to be featured.Adding end screens to your YouTube videos
  9. Adjust the placement and size of each element on the grid. Adjust the time for the element to show in the timeline below.
  10. Click Save.

While you’re adding end screens you can select to preview how they’ll appear in the player, and you can go back to edit end screens at any time.

Four tips to increase the effectiveness of end screens

YouTube recommends that you:

  • Feature elements that are relevant to your video.
  • Encourage viewers to click by using unique calls-to-action for different end screen elements.
  • Leave enough space and time at the end of the video for an end screen. Make sure you consider the video’s last 20 seconds when editing it.
  • Consider timing end screen elements to appear at different times so they don’t compete with one another.

What do you think? Useful YouTube tool? Will you deactivate your old annotations? Comment below!

The post How to add end screens to your YouTube videos appeared first on DIY Musician Blog.
Top tips for boosting video views on YouTube

$
0
0

YouTube is the number one search engine for music. Because of this, many musicians have turned to video to promote themselves and their work. Plus, videos on YouTube are an income stream for musician thanks to ad revenue share — especially when there’s a lot of views.

If you’re planning on making a video, try these techniques to boost your views:

1. Give Your Video A “Clickable” Name

Picking the right name for your video can generate views, even if fans don’t know what they’re going to get when they click on it. After all, videos don’t take a lot of time or commitment to try out so titles that are mysterious, sexy, or hint at controversy can get clicked no matter what’s in the video.

Try testing out alternative titles for your videos with friends before posting them to see which one might be the most intriguing. Also, keep in mind picking the right title is also important for your blog posts, newsletters, and other communications. And finally, if you can come up with a title that people are likely to search on you can get hits.

2. Add a Post-Roll after the Video and Add a Call to Action

Don’t just let the video end! You worked hard to get viewers to watch your video, so add a post-roll so you can promote your channel while you still have their attention. Use it to ask your fans to:

  • subscribe to your channel
  • like your video
  • buy your track or music (link it directly in the video description!)
  • share your video with their friends
  • watch other videos on your channel
  • watch other artists and creators you work with

There’s no need to do all of these calls to action, but at a minimum always ask them to subscribe so that you can get one-time watchers to catch your next release. Plus the extra audio means that they can’t directly rip the track from YouTube to listen to it, and will be more likely to buy it or stream it.

3. Make Your Video Cool to Share (The “Nice Peter” Principle)

Pete Shukoff (a.k.a. Nice Peter), who’s one half of the creative team behind Epic Rap Battles of History explained his goal has always been to make videos that make people look cool for sharing them with their friends. With Epic Rap Battles of History videos generating 50 to 120 million views or more, it’s clearly a winning formula. When you make your videos with this in mind, it changes your perspective. For ideas, take inspiration from videos you’ve shared with your friends (even if it’s not music related).

4. Cross-Promote with Other Musicians and Video Creators

Borrow audiences to pull in new viewers. Collaborate with other creators (not just musicians!) on your next music or video projects. For example, Nice Peter and EpicLLOYD worked with Key & Peele, Snoop Dogg, and “Weird Al” Yankovic just to name a few.

You can also target other websites that have audiences as well. If you can find a way to make your videos relevant to what a popular site covers, share it with them and see if they’ll post it.

Also, trade “likes” with other creators since your videos will appear in each of their feeds. And remember that videos can also be cross-promoted on your co-creator’s blog, social media, or newsletter — don’t just limit yourself to the world of YouTube.

5. Use Your Social Networks to Announce and Share Your Content

YouTube made video one of the easiest types of media to share online. So use your social networks to announce when your video is posted to get it noticed, watched, and shared. Also, be sure to encourage them to like, subscribe, and share.

6. Organize Your Channel by Content

If you’re going to be releasing more than one type of music video, organize your channel by grouping related content into playlists so viewers can easily find what they are looking for. For instance, create separate playlists for your music videos, live footage, vlog, behind-the-scenes footage, and so on. Although you can split your content into separate YouTube accounts, it’s better to funnel all of your subscribers and views into a single channel, since higher overall numbers help drive new viewers.

7. Pay to Promote (If It Makes Sense)

Advertising isn’t too expensive given today’s platforms, and YouTube allows for a few types of paid promotion.

For example, if you meet their conditions, you can create a video ad to promote your channel (FanFinder). You can also use Google’s Adwords to promote your video and channel (Adwords for Video).

Other options include Facebook and Twitter. Make sure to keep an eye on your statistics. This will help you understand which videos fans are liking and responding to so you know if your promotional campaigns are working and worth the expense.


The steps for improving your viewership starts before you create and produce your videos and continues long after the release. The more you plan in advance for generating views, the easier it is to pull off.

Finally, if your video gets popular, don’t forget to modify the video description, discussion, and annotations on it in order to promote your other work. Take advantage of the eyeballs! A single success can be used as a launching point for all of your future efforts.

The post Top tips for boosting video views on YouTube appeared first on DIY Musician Blog.
6 ways to earn more money from your music on YouTube this Holiday Season

$
0
0

Prep for the holidays; reap the benefits year-round!

Aunt Sue is wondering whether she really wants to buy you the album you asked for this Christmas, the one by Sexy Demonic Wombats from Beyond the Gates of Oblivion (“SDWBGO” for short).

If she’s like most people with Internet access, she’ll turn to YouTube for a minute or two of “research” first.

Much to her surprise and relief, Demonic Wombats is a mostly harmless polka band that performs 1970’s prog-rock covers — so you’re all set. She orders the CD and everyone (Aunt Sue, you, the Wombats) is happy come Christmas.

This is just one of countless examples of how people use YouTube these days. The video streaming giant is now the world’s jukebox, a customizable replacement for both MTV and radio, a deep musical archive, the #1 search engine for music, the #1 music discovery tool online, and much more — all available on your smartphone.

So it’s hardly surprising that artists are now earning so much in YouTube ad revenue. CD Baby pays hundreds of thousands of dollars a month to indie musicians for the usage of their music on YouTube — and the holidays also happen to coincide (not… coincidentally, of course) with a huge spike in YouTube advertising revenue.

One interesting and encouraging thing about the amount of revenue artists generate on YouTube is that people who’ve monetized their music are actually earning more from fan-created videos (also known as “user-generated content,” or U.G.C.) than from the official music videos they’ve uploaded to YouTube themselves.

[Check out our podcast interview with Josh Collum to hear an example of how one artist earned more than $200k from user-generated content.]

As I’ve said in previous articles, the modern music industry is built on a social economy. What your fans do (and want to do) with your music has real value.

No, you’re not going to earn nearly as much per usage as you might if the same song were licensed for a Coke commercial. Instead, with YouTube, it’s all about VOLUME and time (since the videos that use your music will be up on YouTube for quite a while) — and as our monthly YouTube payouts demonstrate, when your fan community is empowered to take social action with your music, you make money.

Here are 6 tips to help you make more money from your music on YouTube (this holiday season and beyond)

Making money from your music on YouTube isn’t just a holiday thing, but this busy music season is a perfect time to make sure you’re doing all you can to take advantage of this increasingly important revenue stream.

1. Sign up your entire back catalog for CD Baby’s YouTube Monetization program

The obvious early step to earning money from your music on YouTube… is getting set up to earn money from your music on YouTube!

In the digital age, your music doesn’t have a shelf life — and you never know when one of your songs will find its audience. So sign up ALL your songs, old and new.

2. Encourage your fans to create user-generated content

It’s the holidays! One of your songs might be the perfect soundtrack to someone’s ugly-sweater video Christmas card, or as the background music to a classic home movie of kids unwrapping presents around the tree.

Here are a few ways to get people to use your music:

* email your fans and let them know they’re free to use your songs for their holiday videos, wedding videos, family reunion videos, company or school projects, vacation slideshows, etc. Your songs are already in heavy rotation in these peoples’ households; might as well be in their crazy cat videos, too! If one of them goes viral, you’ll make even more money.

* host a video contest where you ask your fans to create music videos for their favorite of your songs. Whether its footage of a dance party, a stop-motion animation, or a bunch of kids lip syncing, these kinds of videos can add up to serious ad revenue from YouTube. Plus, you’ll get to share your favorite of these entries through your website, newsletter, and social.

3. Put your most important links at the top of your video descriptions

For any videos you upload to your own channel, be sure to include the URL to your website or preferred music store right at the top of the description. You want viewers to be able to click through without having to scroll down or hit the “show more” button. Don’t make people search.

4. Create and upload videos for ALL your songs

In addition to all the other things YouTube has become, it’s also the #1 preferred listening platform for younger music fans. Make it easy for them to hear your music. The more videos you make available, the more opportunities you have to earn ad revenue.

If you don’t have the time or budget to shoot that many “proper” music videos, you should at the very least upload simple album art videos for every song.

[Important: if your distribution through CD Baby includes streaming services, we will deliver Art Track videos to YouTube for you!]

5. Record a holiday greeting video

If it’s not in the cards to film a video for a Holiday single or to shoot a live performance, just use the camera on your smartphone and say hi to your fans. Post it on YouTube, embed it on your website, and spread some cheer!

6. Use smart calls-to-action, cards, and end screens

YouTube offers a number of tools to enhance your videos and to drive further engagement. Be sure to explore all your options within your YouTube channel, including adding cards to your videos that will encourage purchases, boost channel subscriptions, increase views, and more. Also be sure to check out end screens!

—-

What are your tips for boosting YouTube activity (and ad revenue) this holiday season? Let us know in the comments below.

[Take your YouTube presence to the next level with Illustrated Sound. Click HERE.]

[Photo of YouTube app in iPhone from Bloomua / Shutterstock.com]

The post 6 ways to earn more money from your music on YouTube this Holiday Season appeared first on DIY Musician Blog.

Super Chat: a new way to make money on YouTube

$
0
0

Your fans can pay to highlight and pin their messages to your chat feed during a live stream.

YouTube is now beta testing a new message system that they plan to roll out more broadly on January 31st for creators in 20 countries, and for viewers in more than 40 countries.

It’s called Super Chat, a monetized tool that allows fans and creators to connect during live streams.

[Take your YouTube channel to the next level with Illustrated Sound, CD Baby’s YouTube network.]

Here’s how it works: Imagine you’re live streaming a concert from your living room, or giving fans a glimpse of your work in the recording studio; anyone who’s watching your live stream on YouTube can purchase a Super Chat, which is a message in the chat feed that’s highlighted so it stands out from the rest of the comments so it’s sure to get your attention while you’re streaming (assuming that you’re monitoring the conversation).

The color of the highlighted message, the length of the message, and the duration which the message stays pinned to the top of the chat (up to five hours) are all determined by the amount of the Super Chat purchase.

YouTube says this of Super Chat:

For creators, this means Super Chat does double duty: keeping their conversations and connections with (super) fans meaningful and lively while also giving creators a new way to make money.

If you’re already live streaming on YouTube, Super Chat could give you a new way to make money from your efforts.

Are you excited about this new tool? Skeptical? Let me know in the comments.

The post Super Chat: a new way to make money on YouTube appeared first on DIY Musician Blog.

There’s no excuse for not optimizing your YouTube videos

$
0
0

5 simple ways to drive more video views on YouTube.

Let’s assume you’ve got great music and a great music video. You worked hard on that video and you’re ready to share it with your fans.

YouTube gives you quite a few ways to “optimize” your videos so you can get more out of them and see greater engagement. Some of these things are so simple that there’s really no excuse for not doing them any time you upload a new video. What are they?

1. Use playlists

Create playlists (for instance: live videos, music videos, lyric videos, interviews, etc.) and arrange your videos accordingly. Whenever you share a video, grab the link from within the playlist so that when someone’s done watching the one video, another one begins playing automatically. Go HERE to find out how.

2. Custom thumbnails

Whenever you upload a video, YouTube gives you a few default options to select as the thumbnail (the still image representing your video that someone sees before clicking to play it). Those options might not be the most thrilling or intriguing moments from your video. Instead, create and upload a custom thumbnail that’s sure to entice. Go HERE to find out how.

3. End screens

End screens are extra visual elements that appear during the last 20 seconds of your video (on both mobile and desktop) that allow you to encourage additional views for videos and playlists, subscribes, merch sales, and more. Learn how to add End Screens to your videos HERE.

4. Cards

Like end screens, cards are visual elements that appear while the video is playing to help you boost subscribes, views, sales, etc. Unlike end screens, a card can appear at any time during the video. You designate a moment in the timeline where the card will first appear (though YouTube may adjust that for further optimization), and viewers can click to expand the cards at any time for further information. Go HERE to learn more about YouTube cards.

5. Video descriptions

It happens often, and I’m still always shocked, when I watch a YouTube video and see the video description has been pretty much ignored. It might say something like “Filmed live on 03/04/17.” Really? What about the venue, the song, the band name, the songwriters, the players? The lyrics? Links to subscribe or follow you on social? Give us some details — and some keywords! It only takes 5 minutes. Plus, all that information helps YouTube more accurately index your video for search.


That’s it. Easy. So easy that you have no excuse to ignore these optimization methods, right?

Got any other easy optimization tips for YouTube videos? Let me know in the comments below.

The post There’s no excuse for not optimizing your YouTube videos appeared first on DIY Musician Blog.

Viewing all 87 articles
Browse latest View live


Latest Images